Database
Mail enables a computer running SQL Server to send outbound mail messages. Although
messages can contain the results of queries, Database Mail is primarily used to
send alert messages to administrators to notify
them of performance conditions or changes that have been made to
objects.


A. Sending an e-mail message
This example sends an e-mail message to Dan Wilson using the e-mail address mailid@Company.com. The message has the subject Automated Success Message. The body of the message contains the sentence 'The stored procedure finished successfully'.
EXEC msdb.dbo.sp_send_dbmail
@profile_name = 'TestProfile',
@recipients = 'mailid@company.com',
@body = 'The stored procedure finished successfully.',
@subject = 'Automated Success Message' ;
B. Sending an e-mail message with the results of a query
This example sends an e-mail message to Dan Wilson using the e-mail address mailid@Company.com. The message has the subject Work Order Count, and executes a query that shows the number of work orders with a DueDate less than two days after April 30, 2004. Database Mail attaches the result as a text file.
EXEC msdb.dbo.sp_send_dbmail
@profile_name = 'TestProfile',
@recipients = 'mailid@Company.com',
@query = 'SELECT COUNT(*) FROM AdventureWorks2012.Production.WorkOrder
WHERE DueDate > ''2004-04-30''
AND DATEDIFF(dd, ''2004-04-30'', DueDate) < 2' ,
@subject = 'Work Order Count',
@attach_query_result_as_file = 1 ;
C. Sending an HTML e-mail message
This example sends an e-mail message to Dan Wilson using the e-mail address mailid@Company.com. The message has the subject Work Order List, and contains an HTML document that shows the work orders with a DueDate less than two days after April 30, 2004. Database Mail sends the message in HTML format.
DECLARE @tableHTML NVARCHAR(MAX) ;
SET @tableHTML =
N'<H1>Work Order Report</H1>' +
N'<table border="1">' +
N'<tr><th>Work Order ID</th><th>Product ID</th>' +
N'<th>Name</th><th>Order Qty</th><th>Due Date</th>' +
N'<th>Expected Revenue</th></tr>' +
CAST ( ( SELECT td = wo.WorkOrderID, '',
td = p.ProductID, '',
td = p.Name, '',
td = wo.OrderQty, '',
td = wo.DueDate, '',
td = (p.ListPrice - p.StandardCost) * wo.OrderQty
FROM AdventureWorks.Production.WorkOrder as wo
JOIN AdventureWorks.Production.Product AS p
ON wo.ProductID = p.ProductID
WHERE DueDate > '2004-04-30'
AND DATEDIFF(dd, '2004-04-30', DueDate) < 2
ORDER BY DueDate ASC,
(p.ListPrice - p.StandardCost) * wo.OrderQty DESC
FOR XML PATH('tr'), TYPE
) AS NVARCHAR(MAX) ) +
N'</table>' ;
EXEC msdb.dbo.sp_send_dbmail @recipients='mailid@Company.com',
@subject = 'Work Order List',
@body = @tableHTML,
@body_format = 'HTML' ;
Thanks for following this blog. Please comment on this post if have any questions and suggestions.
Database
Mail uses the Simple Mail Transfer Protocol (SMTP) relay service that is
available on all Windows machines to transmit mail messages.
When a mail send is initiated, the message along
with all of the message properties is logged into a table in the Msdb database.
On a periodic
basis, a background task that is managed by SQL Server Agent executes. When
the mail send
process executes, all messages within the send queue that have not yet been
forwarded are
picked up and sent using the appropriate mail profile.
A
given profile can contain multiple e-mail accounts to provide a failover
capability in the event a specific mail server is
unavailable. Mail accounts define all the
properties associated to a specific e-mail account such as e-mail
address, reply to
e-mail address, mail server name, port number, and authentication credentials.
You
can secure access to a mail profile to restrict
the user’s ability to send mail through a given profile. When a profile is
created, you can configure the profile to be either a public or private profile.
A public profile can be accessed by any user with the ability to send
mail. A private profile can be accessed
only by those users who have been granted access to the mail profile
explicitly.
We can configure
Database Mail as shown below.
1. Open SQL Server
Management Studio, connect to your SQL Server instance, and click New Query to open a new query window and execute the following code to enable the Database
Mail feature:
EXEC sp_configure
'Database Mail XPs',1
GO
RECONFIGURE WITH
OVERRIDE
GO
2. Connect to SQL Serve and expand the 'Management' folder, right click on the 'Database Mail' and choose the 'Configure Database Mail' from the short cut menu as shown below.
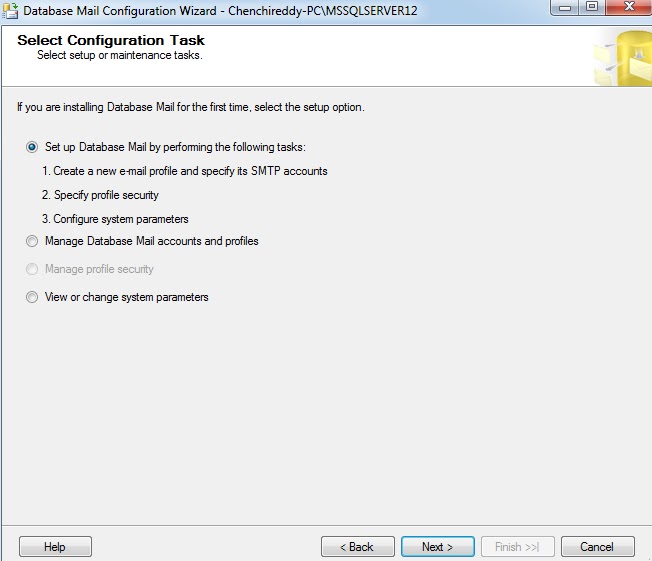
3. Set up Database Mail by creating a new e-mail profile and specifying its SMTP accounts as shown below screen shot. Click on Next button.
4. Specify the profile name, description, accounts and fail-over priority as shown below.
Click on Add button, you can get the below screen shot.
5. Now specify the account name, description and SMTP account details as shown below.
Click on OK.
6. We can manage the profile security by choosing either Public Profiles or Private Profiles as shown below.

7. The private profiles can only be accessed by a specific user of a mail-host database.
Click on Next button.
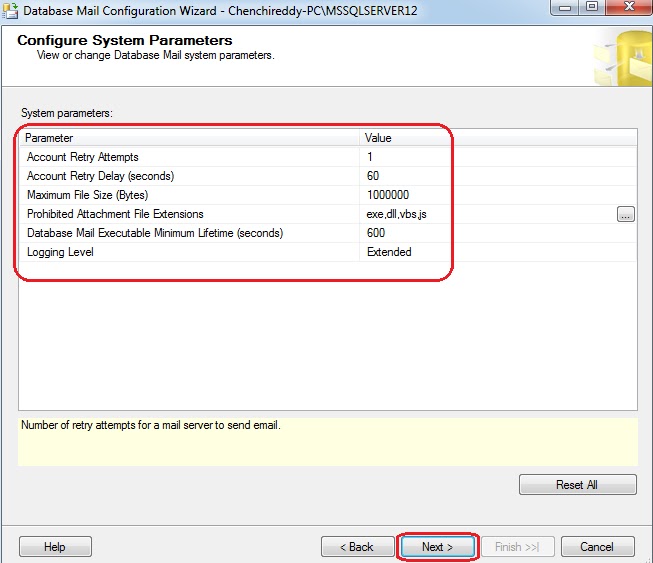
8. Now we can get the Database Mail System parameters as shown below.
Click on Next button.
9. Now verify the actions the wizard is about to perform, and then click finish to execute these actions on the server.
Click on Finish button.
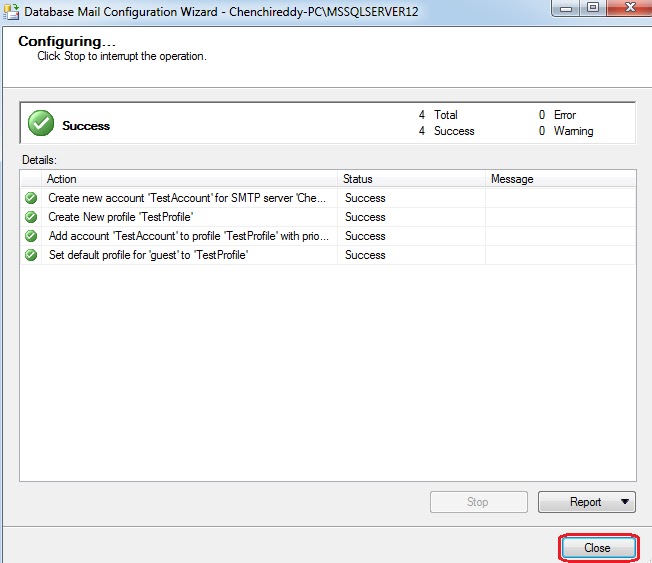
10. Finally, we get the completion report as shown below.
Click on Close button.
A. Sending an e-mail message
This example sends an e-mail message to Dan Wilson using the e-mail address mailid@Company.com. The message has the subject Automated Success Message. The body of the message contains the sentence 'The stored procedure finished successfully'.
EXEC msdb.dbo.sp_send_dbmail
@profile_name = 'TestProfile',
@recipients = 'mailid@company.com',
@body = 'The stored procedure finished successfully.',
@subject = 'Automated Success Message' ;
B. Sending an e-mail message with the results of a query
This example sends an e-mail message to Dan Wilson using the e-mail address mailid@Company.com. The message has the subject Work Order Count, and executes a query that shows the number of work orders with a DueDate less than two days after April 30, 2004. Database Mail attaches the result as a text file.
EXEC msdb.dbo.sp_send_dbmail
@profile_name = 'TestProfile',
@recipients = 'mailid@Company.com',
@query = 'SELECT COUNT(*) FROM AdventureWorks2012.Production.WorkOrder
WHERE DueDate > ''2004-04-30''
AND DATEDIFF(dd, ''2004-04-30'', DueDate) < 2' ,
@subject = 'Work Order Count',
@attach_query_result_as_file = 1 ;
C. Sending an HTML e-mail message
This example sends an e-mail message to Dan Wilson using the e-mail address mailid@Company.com. The message has the subject Work Order List, and contains an HTML document that shows the work orders with a DueDate less than two days after April 30, 2004. Database Mail sends the message in HTML format.
DECLARE @tableHTML NVARCHAR(MAX) ;
SET @tableHTML =
N'<H1>Work Order Report</H1>' +
N'<table border="1">' +
N'<tr><th>Work Order ID</th><th>Product ID</th>' +
N'<th>Name</th><th>Order Qty</th><th>Due Date</th>' +
N'<th>Expected Revenue</th></tr>' +
CAST ( ( SELECT td = wo.WorkOrderID, '',
td = p.ProductID, '',
td = p.Name, '',
td = wo.OrderQty, '',
td = wo.DueDate, '',
td = (p.ListPrice - p.StandardCost) * wo.OrderQty
FROM AdventureWorks.Production.WorkOrder as wo
JOIN AdventureWorks.Production.Product AS p
ON wo.ProductID = p.ProductID
WHERE DueDate > '2004-04-30'
AND DATEDIFF(dd, '2004-04-30', DueDate) < 2
ORDER BY DueDate ASC,
(p.ListPrice - p.StandardCost) * wo.OrderQty DESC
FOR XML PATH('tr'), TYPE
) AS NVARCHAR(MAX) ) +
N'</table>' ;
EXEC msdb.dbo.sp_send_dbmail @recipients='mailid@Company.com',
@subject = 'Work Order List',
@body = @tableHTML,
@body_format = 'HTML' ;
Thanks for following this blog. Please comment on this post if have any questions and suggestions.
No comments:
Post a Comment