We
can follow the follow the number of ways to copy data form one table to another
table within the same database or other databases either within the same SQL
Server instance or other SQL Server instance.
Method1:
Using SELECT * INTO
The
“SELECT * INTO” command will do the following tasks.
- Create a table
with the name “dbo.table2” with the same physical structure of
“dbo.table1”
- Data will be
copied from “dbo.table1” to “dbo.table2”
SELECT *
INTO dbo.table2
FROM dbo.table1
Copy the limited records by using WHERE clause.
SELECT *
INTO dbo.table2
FROM dbo.table1
WHERE name =
‘One’
Copy the records from a table that is existing in other
database.
SELECT * INTO AdventureWorksDW.dbo.table2 FROM
AdventureWorks.dbo.table1 WHERE name = ‘One’
Copy
the records from a table that exists in the any database on different SQL
Server instance. This approach required to configure linked server between
source and target servers.
SELECT * INTO Target_ServerName.AdventureWorksDW.dbo.table2 FROM
Source_ServerName.AdventureWorks.dbo.table1
WHERE name =
‘One’
The above command
below will not work if the target table “dbo.table2” already exists in the
target database.
Method2:
Using INSERT INTO
The “INSERT INTO” command will copy the data from a source
table to target table like SELECT * INTO, but INSERT INTO do not create any
table in the target. In this case, the target table should be existed before
copying data into target database table.
Syntax: INSERT INTO
Target_ServerName.Database_Name.Schema_Name.Table_Name SELECT * FROM
Source_ServerName.Database_Name.Schema_Name.Table_Name
Note: The source table and target table both having same
physical structure.
Example:
INSERT INTO
Target_ServerName.AdventureWorksDW.dbo.table2 SELECT * FROM Source_ServerName.AdventureWorks.dbo.table1 WHERE name = ‘One’
Method3: Using import and export wizard:
Import
and export wizard allows the user to copy data from one or more tables between
two different SQL Server instances.
Step1: Connect to the destination server and expand databases node.

Step2: Right click on the target database, select Tasks, then choose Import Data from the short cut menu as shown below.

Step3: Now you can see a Welcome window of Import and Export Wizard. Click Next button.

Step4: Choose the Data source name. If you want to import data from other SQL Server, then you can choose "SQL Server Native Client 10.0" as shown below.

Step5: Choose the Source Server Name and Database Name as shown below. Click on Next button.

Step6: Now you have to choose the Destination Server Name and Database Name as shown below. Click on Next button.

Step7: Specify the Table copy or Query. If you want to copy the entire table data, then you can choose the first option.
If you want to copy the data using an SQL query to restrict or manipulate the source data, then you can choose the second option.
Click on the Next button.

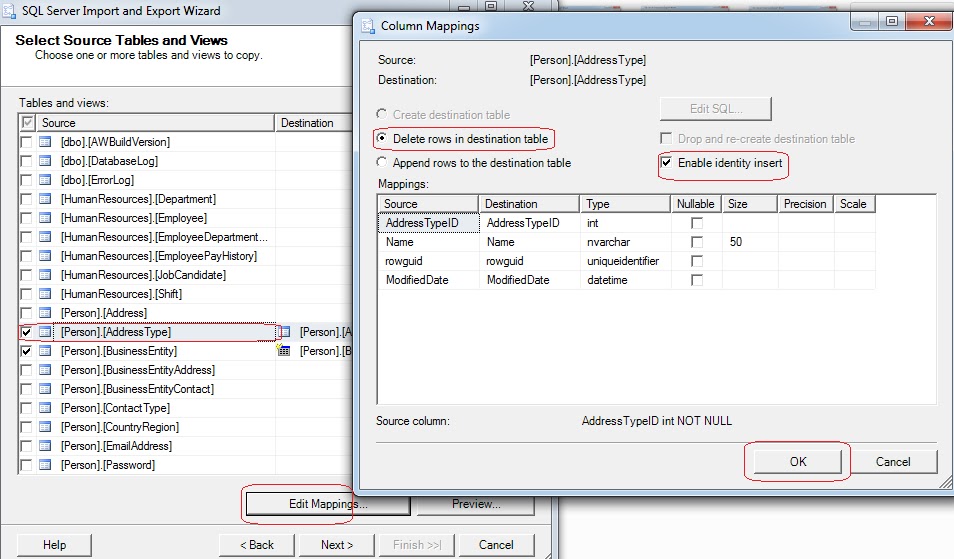
Step8: Now you can see the two tables, one table (Person.AddressType) is already existed in the target database and the second table (person.BusinessEntity) does not existed in the target table.
Now I am configuring to truncate and load the data into the first table (Person.AddressType).
Select the table by selecting the check box.
Click on the EDIT MAPPINGS button.
Now we can see the Column Mappings, then we can choose the "Delete rows in destination table" to truncate the table before copying data into the destination table.
Select "Enable Identity Insert". This option allows to insert data into the Identity columns.
Click OK button on the Column Mappings Window to return to the Import and Export Wizard.
Step9: Now you can choose the Second table (Person.BusinessEntity) and then goto "Edit Mappings". The Column Mappings window shows "Create destination table" option to create the table in the destination database.
Click OK button on the Column Mappings to go back to the Import and Export Wizard.
Click on the Next button on the Import and Export Wizard.

Step10: Now we can generate a SSIS package to save this entire task onto a physical location or in SQL Server.
Click on the Next button.

Step11: Before clicking the Finish button, verify the complete report to ensure the correct source and destination server names and how the data is loading into the destination tables.
Click on the Finish button.

Step12:
Now the Import and Export Wizard will start the copying data from source server to destination server.
Thanks for
following this blog. Please comment on this post if have any questions and
suggestions.
No comments:
Post a Comment